Thursday 18 February 2016

Making the Fake Blood

Making the Fake Blood

In our movie opening, our character are covered in bruises and blood all over them. Because of this, we had to obtain some fake blood. We thought about buying it and we researched some ready made ones and worked out the average price.

We decided that the price ranges were good value and that we wouldn't mind buying them if we needed to. We then searched through them and looked through the reviews to see if any of them stained clothing.

However, in the end we decided that the package if we were going to buy it on a website like Amazon, it might arrive too late, and we wouldn't want to wait for it to come.

After we decided this, we started looking up recipes for making blood. In the end we found this website that had several recipes.

There we other websites and tutorials that had videos and pictures, but we chose this website because it had the method that used the more attainable ingredients and easier method.

The Ingredients and Utensils
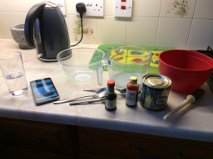
  • Golden Syrup
  • Water
  • Red Food Colouring
  • Flour (to thicken)
  • A Bowl
  • A Spoon


Method
  1. First, we put a tablespoon of Golden Syrup into a bowl.
  2. We then added two table spoons of water to the golden syrup and mixed them together.
  3. After the mixture was a good consistency, we added the red food colouring.
  4. When we mixed the red food colouring in, we then added some flour to make the mixture thicker.
  5. After, we decided that we would need more blood, so we added more water and golden syrup. 
When we finished mixing it, we left it to become thicker, like the website said to so that we were able to use it on the props, and add it to the make up that was already being put on.

After a couple of minutes, the mixture seemed stiffer, so Chayana tried it on her skin, as shown on the picture to the left. We thought that it looked realistic and it was good to use. We also made sure that it was easy to get off, and Chayana was able to get it off easily with water, which was good.


Here is a video of us making the Blood

On Set


Make Up and Costume

We asked Niamh to help create the cuts and bruises and blood effects and well as helping create the rips in costume. 

Niamh after doing the stage makeup on Emily 
Tash going over Emily's makeup before applying the stage makeup
Emily's arm after the during adding the stage makeup

Niamh applying makeup to create the bruises on Emily
Niamh applying stage makeup to create the effect of scratches on Will's arm

The final result after applying stage makeup
to Will
The final result after creating rips and applying
stage makeup to Emily


These photographs of the final results actors helped us when we needed to film on another to day so that the makeup and costumes stayed consistent throughout. Fortunately, we only needed the full photograph of Emily as she was the only actor needed on the second day of filming. 


Niamh applying stage makeup to Sam's hoodie to create the effect of being stabbed.

The final result of Sam's costume

Filming On Set

We each swapped around roles during filming.

Chayana using the boom mic and sound recorder, making sure the microphone isn't in shot and that the sound can be heard.

Tash composing the shot, making sure that both actors will be in the centre of the frame for the two-shot. The positions marked with tape.

Melissa after setting the white balance.


Chayana and Tash checking the recordings after filming the shot


Melissa operating the camera, Chayana operating the lighting and Tash directing the actor and helping Melissa compose the shot


The set up of the forest scene
Melissa experimenting after watching this video. Chayana operating the lights. 
This was one of the hardest shots we did. We wanted to create a still high angle, over the shoulder shot of the character staring out of the window followed by a smooth tilt downwards to the photographs on the table as the actor walks out of shot.

Our issue was that the camera was not close enough to be clear and the zoom didn't create the look that we wanted. So we watched the video in the caption above and tried to recreate it.

To make sure that the camera was still for the over the shoulder shot and that the leg of the Tripod didn't get stuck on the floor (which it did during the tilt), Chayana operated the camera whilst Melissa sat on the floor out of shot, ready to lift and steady the leg for the tilt downwards and Tash operated the lights. 


Emily filming whilst Tash directs and Chayana creates the dragging effect
For this shot, we wanted to create the effect that our protagonist was remembering being dragged through the woods so we wanted a handheld tilt down to her feet whilst moving. At first, we debated lying down on a skateboard but decided against this because it wouldn't create the effect that we wanted.

So, what we did was lay down a shower curtain with a blanket on top. We showed Emily what button recorded and Melissa preset the white balance. Chayana pulled the shower curtain a short way across the bridge whilst Emily created the handheld tilt. Tash directed the shot. 

The Equipment

The Equipment


For filming and recording we used:
  • 1x Boom Mic
  • 1x Voice Recorder
  • 1x Camera
  • 1x Battery Powered LED Light
  • 1x Tripod


However, we had a slight issue with the boom mic. The microphone stand wouldn't attach to the end of the pole: 


We overcame this situation by using layers of tape to secure it in place.


We also used:
  • Homemade Fake Blood
  • 1x Whiteboard (as a makeshift clapperboard)
  • 1x Knife
  • Polaroid Photographs

We would write the shot number (which we took from our story board), the take number, and the shot size on the board and held it in front of the camera before each shot so that it would be easy to find each shot during editing.


To make the fake blood, we used the top recipe on this website.


Mixing the Water, Syrup, Food Colouring,
and Flour together.


A bowl, Golden Syrup, Red Food Colouring
Water, Flower, Spoons, Jug, Brush.


The final result. The blood was
used on the knife and on "John's"
arm at the sink.


Wednesday 17 February 2016

Discussion

After Filming Discussion

Shortly after filming on our final day, we sat down and discussed what we thought went well during filming, what could have gone better, whether it met our expectations, and the issues we faced.


White Balance

The White Balance


To make sure that the colouring of our footage stayed true throughout, we constantly set the white balance by using the 'one push' setting on the camera every time we changed location but also when we moved the camera around the room.

This is because (especially during the kitchen scene) the main source of lighting changed frequently. From one angle, the main source of lighting would be the natural light coming through the window and, from another angle, it would the overhead light in the room.

To make sure that our white balance was set, we would hold up a pad of plain white paper for the setting to work:
Chayana setting the white balance
There were a couple of times where we had issues with the white balance. For example, with the kitchen scene, as stated previously, the main sources of light frequently changed, meaning that after filming one shot, we would find that the footage had an orange quality to it which contrasted with the previous shot so we would have to reset the white balance and re-do the shot. This added to our time.